Review: ZSA Voyager Ergonomic Keyboard
Nov 7, 2023
Review tl;dr: A small and robust ergonomic keyboard that you can take everywhere you go, supported by a great accessory attachment system and ZSA’s unparalleled software ecosystem.
If you find this review helpful, please consider donating to my ergo keyboard review fund, so that I can write more ergo keyboard reviews.
Background
It has been known for a long time that traditional computer keyboards are not great for our bodies. Since the alphabetical and numeric keys are close together, we tend to angle our wrists, leading to ulnar deviation. Also, traditional keyboards form a flat plane (or worse, they are tilted towards the typist), meaning that we have to rotate our hands and arms 90 degrees from its resting (handshake) position, leading to pronation.
Ergonomic keyboards such as the Microsoft Natural Keyboard have tried to solve this by (1) splitting the keyboard halves so that they are (more) in line with our shoulders, and by (2) slightly raising the middle of the keyboard (so-called tenting) to avoid pronation. Only a small number of models went much further, following the pioneering work of Lillian Malt. For instance, the Maltron 3D Keyboard and the Kinesis Contoured Keyboard added thumb keys (so-called thumb clusters), column stagger (the keys in columns are lined up, rather than the keys in the rows), and they introduced concave key wells which tailor the key heights and angles to the finger lengths and movement arcs. In the last decade or so, these features from the Maltron keyboard (except key wells) have become more mainstream in ergonomic keyboards, especially under the influence of the Ergodox keyboard.
Since the emergence of Ergodox-based designs, there has been a very strong trend among enthusiasts to move towards increasingly small designs. For instance, the Ergodox (2012) had 76-80 keys, the Corne (2018) 42 keys, and recent designs like the Ferris (2021) slim the keyboard down to 34 keys. The primary motivation for this reduction in keys is to reduce finger travel. For instance, most 34-key designs have 3 rows and 5 columns per hand for the fingers and two keys per hand for the thumbs. As a result, most fingers only have to travel one key unit (1U) to reach the keys in each finger’s columns, with the largest travel distance being \(\sqrt{2}\)U (diagonal movement of the index fingers to the inner columns).

The removal of keys is on such designs is compensated by the use of layers. Similar to how Shift is used on traditional keyboards to access capitalized letters and additional punctuation symbols, these small keyboards are used with layouts that use multiple layers to access symbols, arrow keys, etc. The philosophy behind the use of layers is that even less used keys are typically within 1U reach.
An additional benefit of smaller keyboards, besides reduced key travel, is that they are extremely portable compared to traditional keyboards. Especially if you are someone who has already dealt with health issues caused by keyboard use, it’s nice to be able to take an ergonomic keyboard with you to avoid laptop keyboards.
Small ergonomic keyboards have primarily been designed and built by hobbyists and require sourcing circuit boards, components and soldering them together. A cottage industry of boutique has sprung up to offer pre-built keyboards. But many of these pre-built keyboards do not have the build quality we have come to expect from mass-manufactured keyboards, while being far more expensive. These pre-builts often have exposed controllers, FDM-printed cases, and will literally fry if you accidentally pull the TRRS cable that links up the keyboard halves while the keyboard is still powered. ZSA is the first larger keyboard manufacturer that fills this gap with the Voyager, a production-quality, small, ergonomic split keyboard.
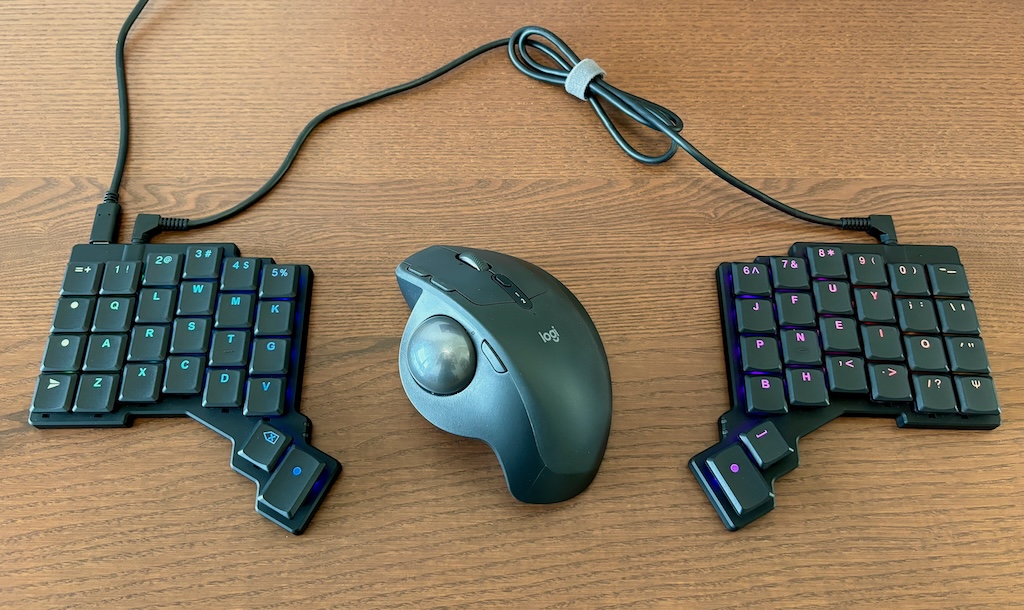
What is the Voyager?
The Voyager is a 52-key, ergonomic split keyboard with Kailh Choc v1 low-profile switches. Since the Voyager has narrow bezels, the footprint of the Voyager is very small. Summarized, the Voyager has the following features:
- Ergonomics: split to avoid ulnar deviation; thumb keys to unload the pinkies; column stagger to make most keys accessible by extending or curling up the fingers; reduced finger travel compared to keyboards with MX switches; and support for tenting to avoid pronation.
- Hotswappable low-profile Kailh Choc v1 switches.
- Per-key RGB backlighting and PBT double-shot keycaps that let the light shine through the legends.
- A magnetic accessory mounting system.
- Uses the opensource, programmable QMK firmware.
- Wired operation (USB-C to host, TRRS between halves).
- A compact travel case.
In this review, I will cover various aspects of the Voyager, such as purchasing and packaging, the keyboard layout, the accessory attachment system, switches and keycaps, build quality, microcontroller and firmware, software, hackability, and traveling with the Voyager.
ZSA sent me a Voyager for free for review without any strings attached. I purchased the Voyager Tripod Mount myself. This is not a sponsored post. I have used the Voyager for two months when writing this review. I am not an ergonomics expert, so this review describes my own experiences and is not health advise.
Purchasing and packaging
The Voyager can only be purchased through the ZSA website. As of writing, the price is $365 including shipping, but excluding duties.
The price of the Voyager may seem steep compared competing boards, however ZSA ships from Taiwan using fast and reliable shipping companies like DHL Express or UPS. Shipping from Taiwan to the rest of the world with express shipping usually costs $80-100 for a smaller package. So that puts the price of the Voyager itself at roughly $265-285, which is competitive with the pricing of many boutique shops and that gives you a keyboard with proper warranty, certification, etc. As I mentioned in my Glove80 review, I find shipping using DHL and the likes preferable over cheaper shipping options. An ergonomic keyboard is quite an investment, so it is nice to have reliable tracking throughout shipping.
You can customize the Voyager at order time. There is a choice in case color (black or white), key caps (US, international, or blank), and switch type (tactile, clicky or linear). Since the Voyager’s switches can be replaced at a later point in time, the only big commitment when ordering is choosing the color of the Voyager.
The Voyager comes in a beautiful synthwave-styled box. The box contains a magnetically-locked folder with 36 additional keycaps and 4 spare switches; the travel case with the Voyager halves and magnetic tenting pucks; a keycap/switch puller; 3 USB-C cables; a TRRS cable; and a USB-C to USB-A converter.
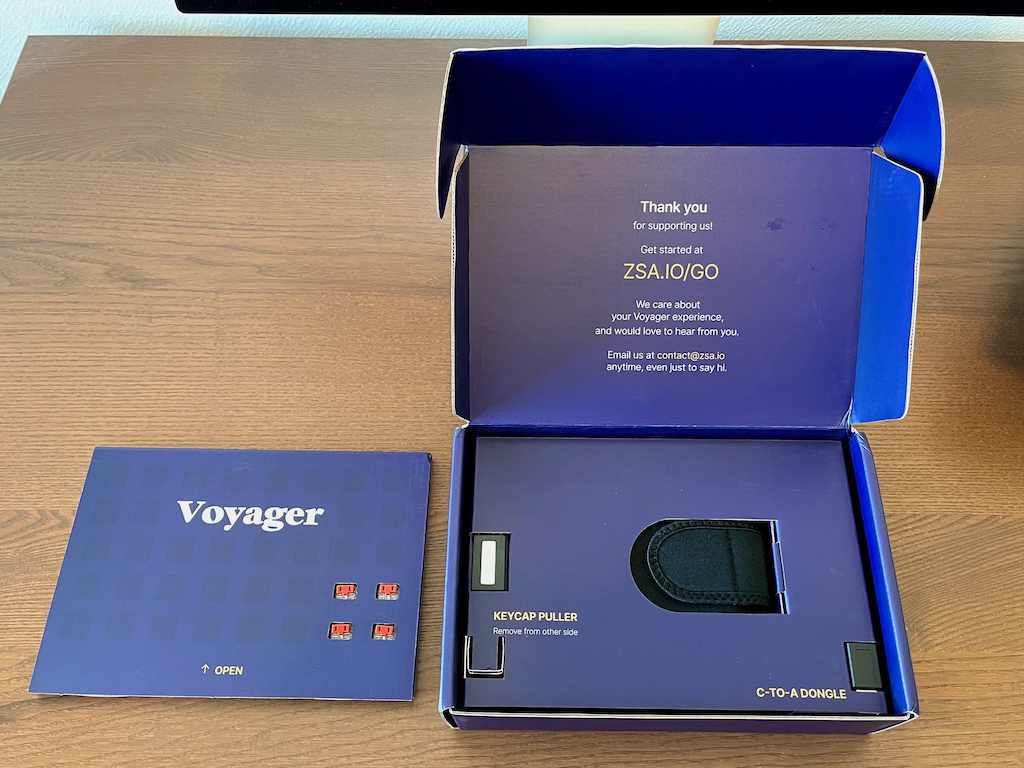
Setting up the Voyager is straightforward — you connect the halves with the TRRS cable and hook up the left half to your computer using one of the USB-C cables.
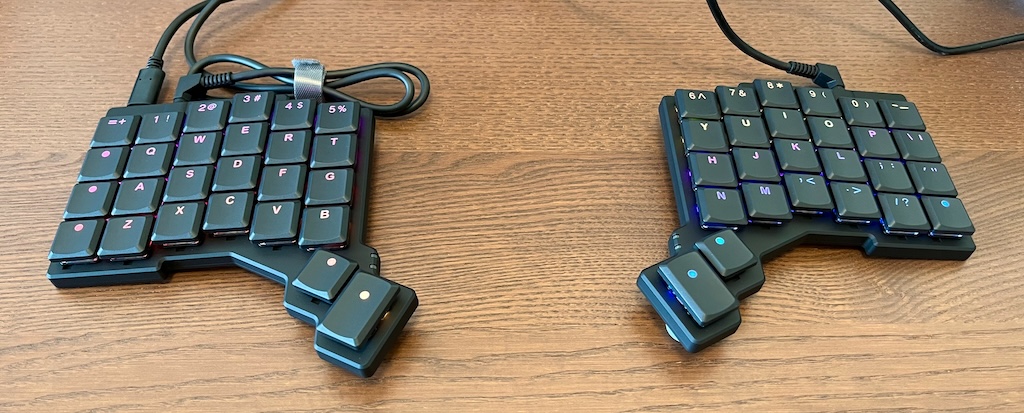
Layout
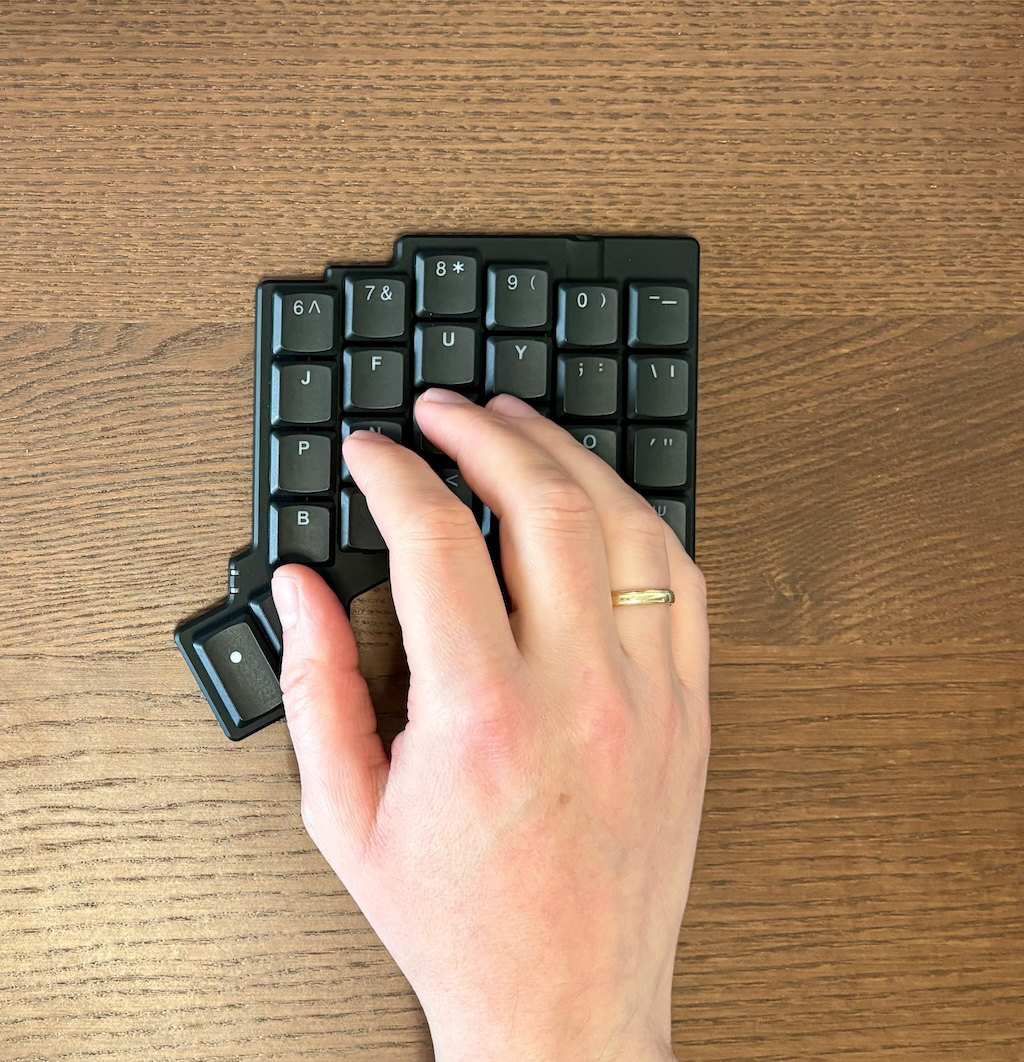
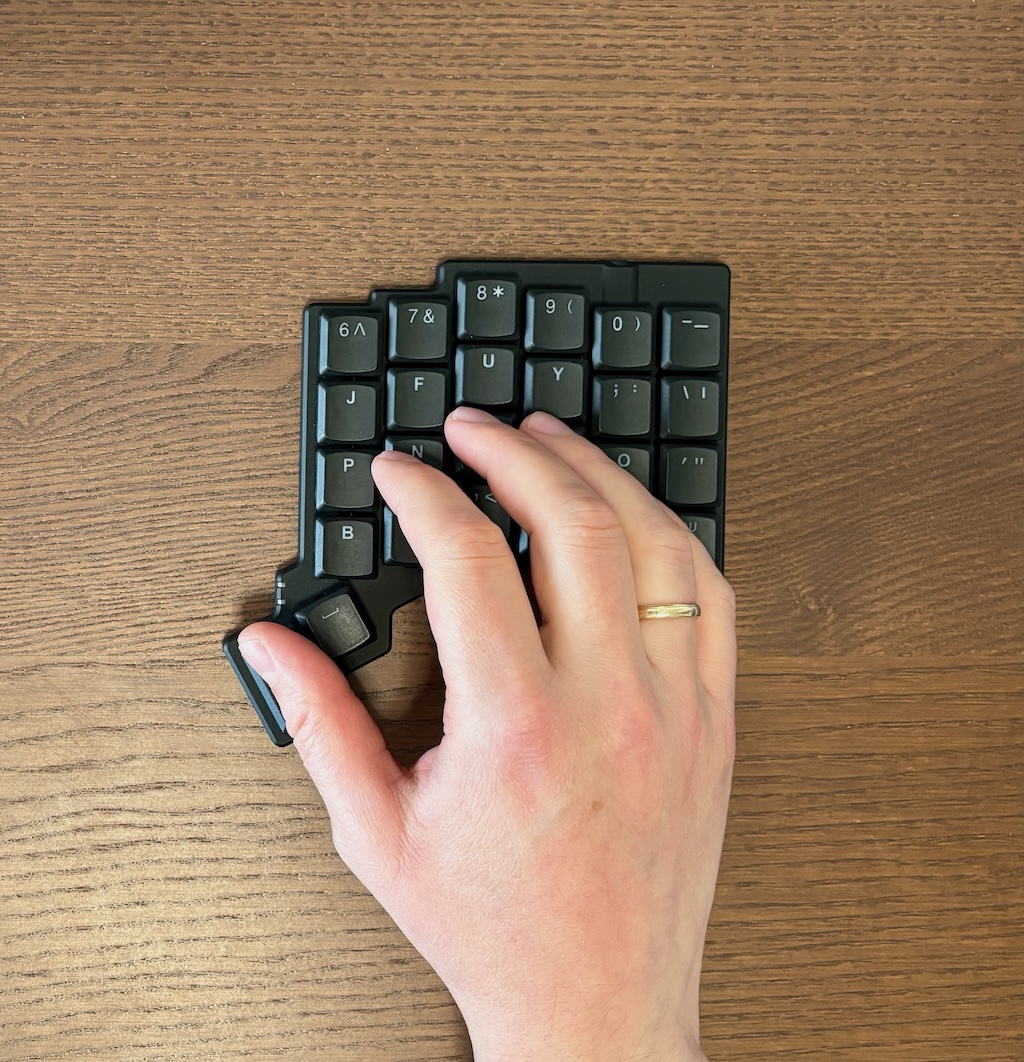
The Voyager has 52 keys: a number row, three alpha rows, two pinky columns and four thumb keys as shown in the default layout below. The finger keys use column stagger. This means that the keys are lined up in columns rather than rows. The columns are at different Y offsets to account for different finger lengths. The columnar arrangement makes it possible to reach all alphanumerical keys (except for the outer index finger and pinky columns) by moving your fingers up or down, making typing much more pleasant than on a row-stagger keyboard. If you have only used row stagger keyboards, there is a learning curve for switching to column stagger, depending on the person this can be anything between a few days and a few months. One important factor that comes into play here is whether you already touch type with ten fingers, since column stagger makes it harder to type with fewer fingers.

The Voyager’s layout strikes a good balance between minimalism and convention. There are enough keys to accommodate a transition from a full-sized keyboard. Only a small number of layers are required since it has a number row and additional symbols can be placed on the outer pinky columns. On the other hand, the Voyager does not have rows that get in the way if you want to use a layout with fewer keys, such as an additional row below the lower alpha row.
One aspect of the layout that users of other ergonomic keyboards may need to adjust to is that the Voyager only has two thumb keys per hand. For me this has not been an issue during the two months I used the Voyager. Frequent use of thumb keys that require a lot of stretching/curling gives me sore thumbs. So, even on keyboards with more than two thumb keys per hand, I put less frequently-used functionality on the keys that are harder to reach. For a keyboard that also aims to be small for travel, it is a good design decision to axe the additional thumb keys. By using holds for layer toggles, four thumb keys still give plenty of immediately accessible layers.
Compared to other (non-concave) ergonomic boards that I have used, the Voyager feels like one of the better ones. The finger stagger is well-designed and the positioning of the thumb keys feels very good. My thumb rests naturally on the first thumb key and the second thumb key is easy to reach. In the remainder of the layout discussion, I will compare the Voyager’s layout to two other popular designs — ZSA’s Moonlander and the Dygma Defy.
Moonlander
Probably the first thing that people who are familiar with ZSA’s Moonlander will notice is that the thumb keys of the Voyager have a different design. As can be seen in the overlay below, the Voyager (purple) uses a smaller rotation of the thumb keys (30 degrees) than the Moonlander (grey, 50 degrees). The thumb keys are also moved slightly closer to the finger keys. Together, this makes the thumb keys on the Voyager easier to reach for people with smaller hands than those on the Moonlander.
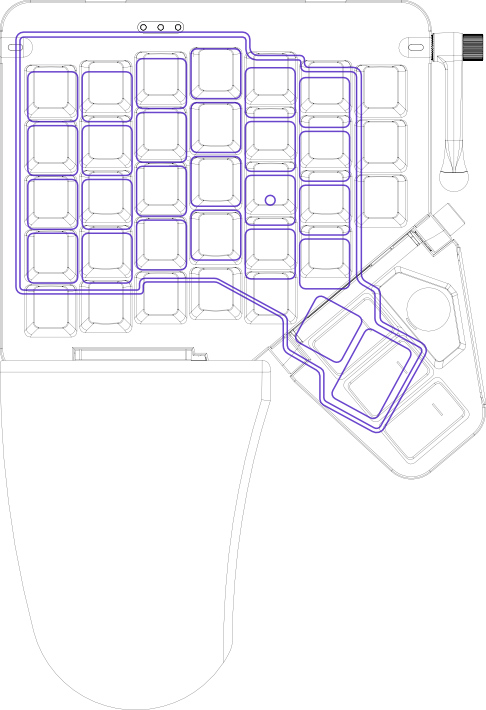
Another clearly visible modification compared to the Moonlander is the column stagger. All columns have shifted down relative to the middle finger column, the index finger columns have even shifted down substantially. As a result, the Voyager takes different finger lengths into account better, which makes the keyboard more feel comfortable.
Dygma Defy
When comparing the Voyager (purple) to another recently released keyboard, the Dygma Defy (black), we can see that the column stagger is similar, except for the index finger columns. The Voyager’s outer index finger column is shifted downwards substantially compared to the Raise. The Voyager takes into account that the reach of the index finger is shorter when crossing over into the outer index column. This makes the upper keys quite a bit easier to reach. This design decision does put the other rows lower, but they are well within the space where curling the index finger up is still comfortable.
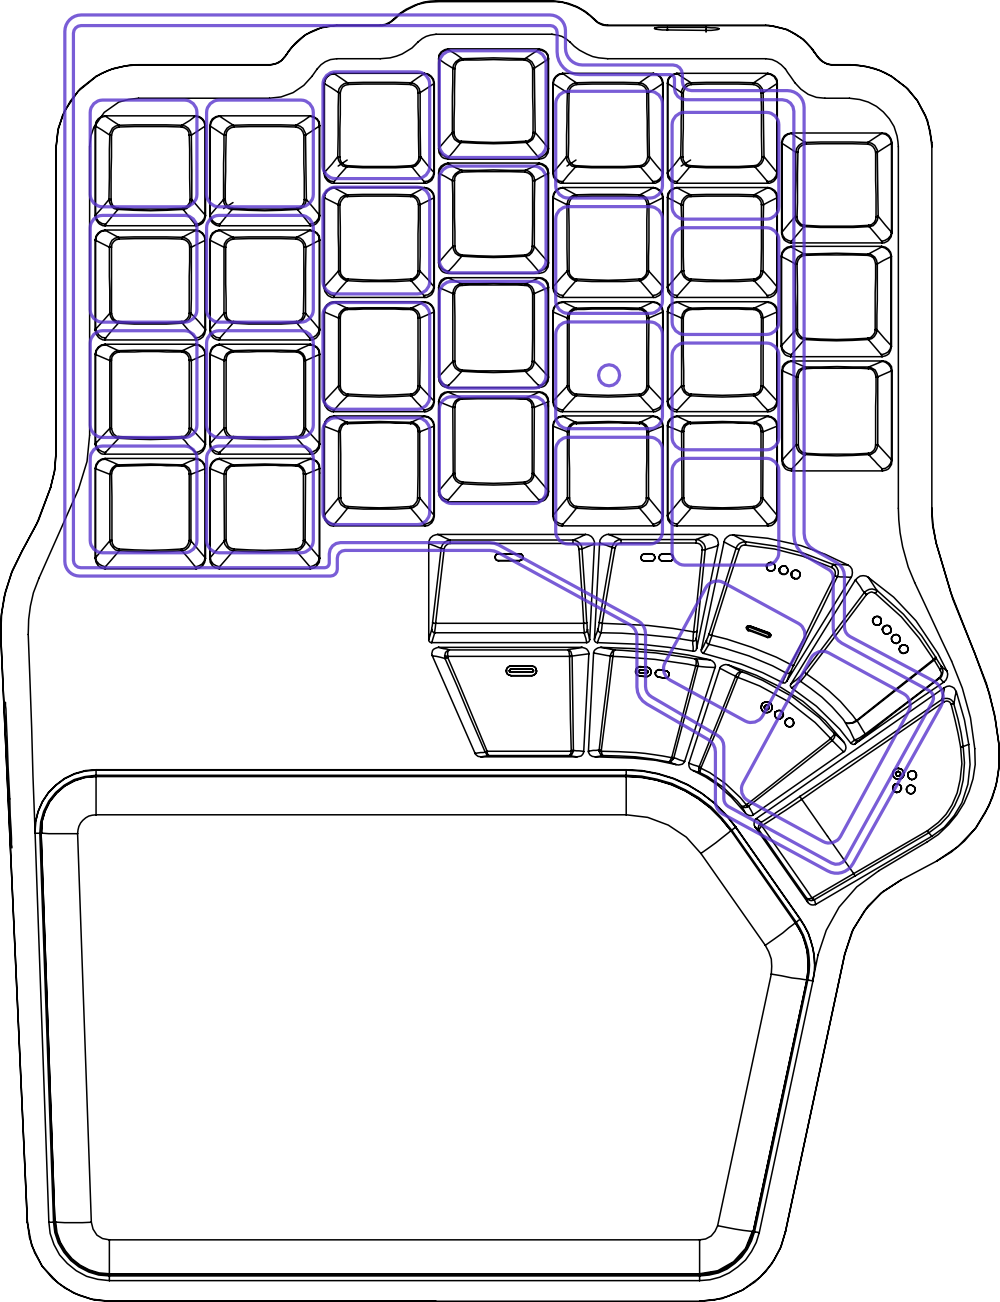
The Voyager’s thumb keys are in the same area considered very comfortable by Dygma’s thumb key guide.
Finally, the overlay shows how much more compact the Voyager is than most other ergonomic keyboards. The Defy’s palm rest cannot be folded up like the Moonlander’s, so it always takes up a large chunk of space when bringing it along in a bag.
Attaching accessories
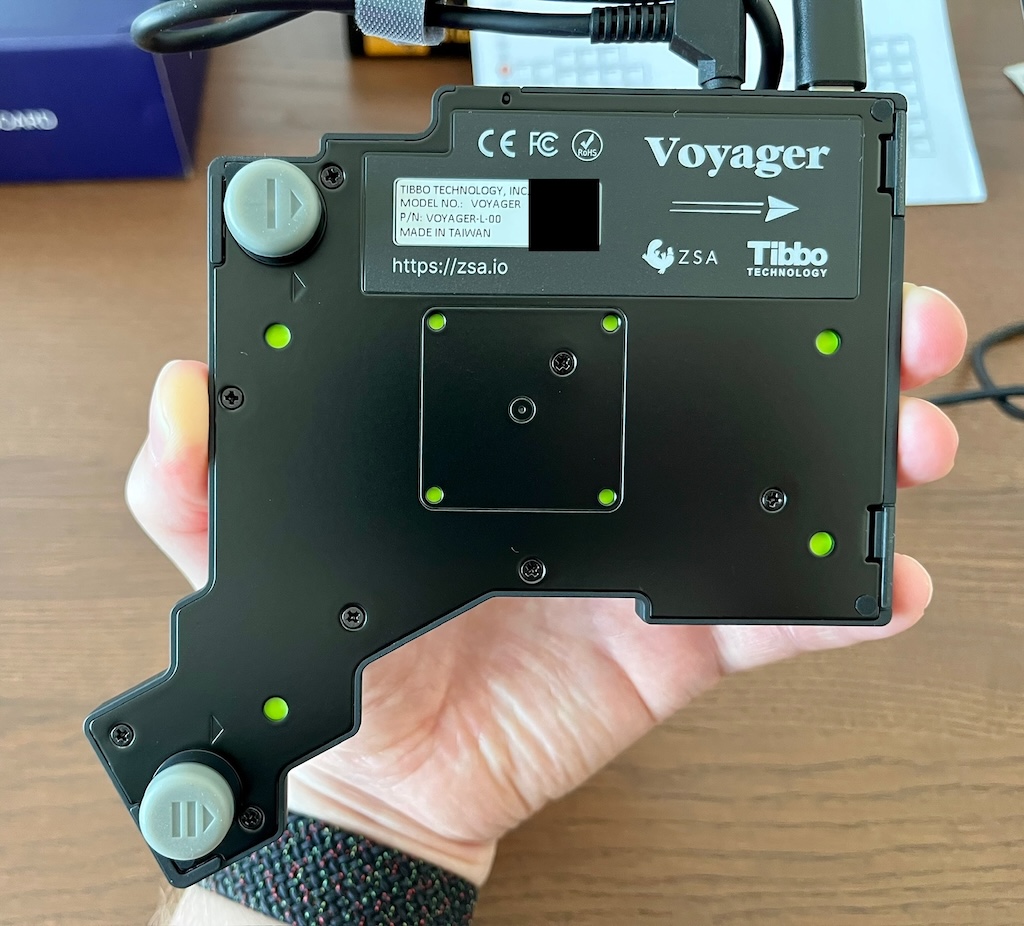
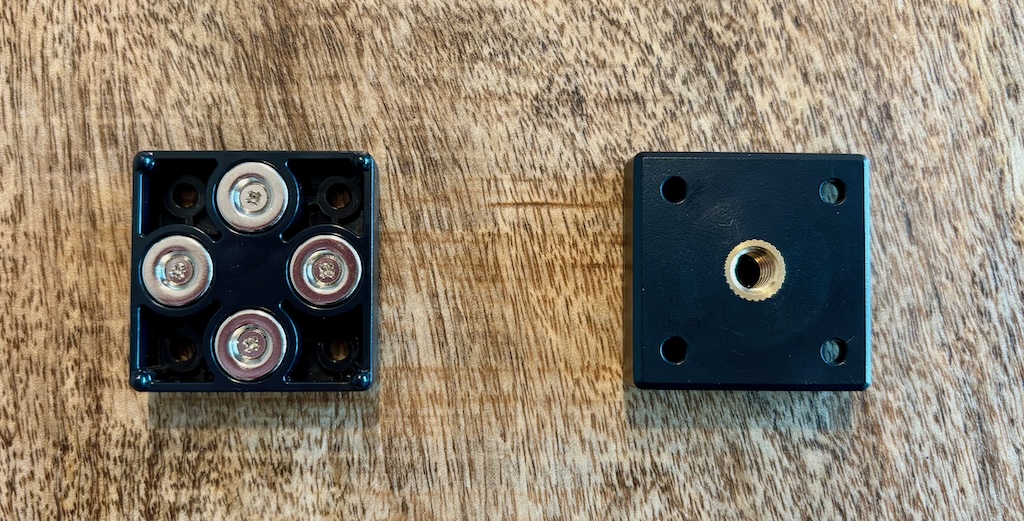
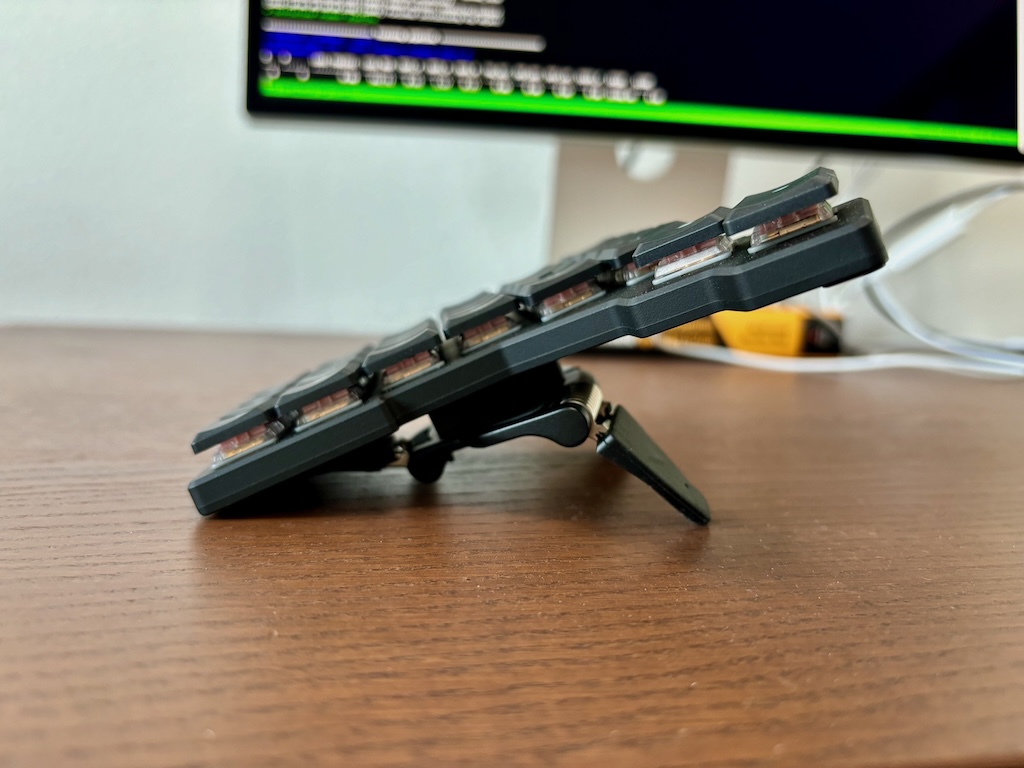
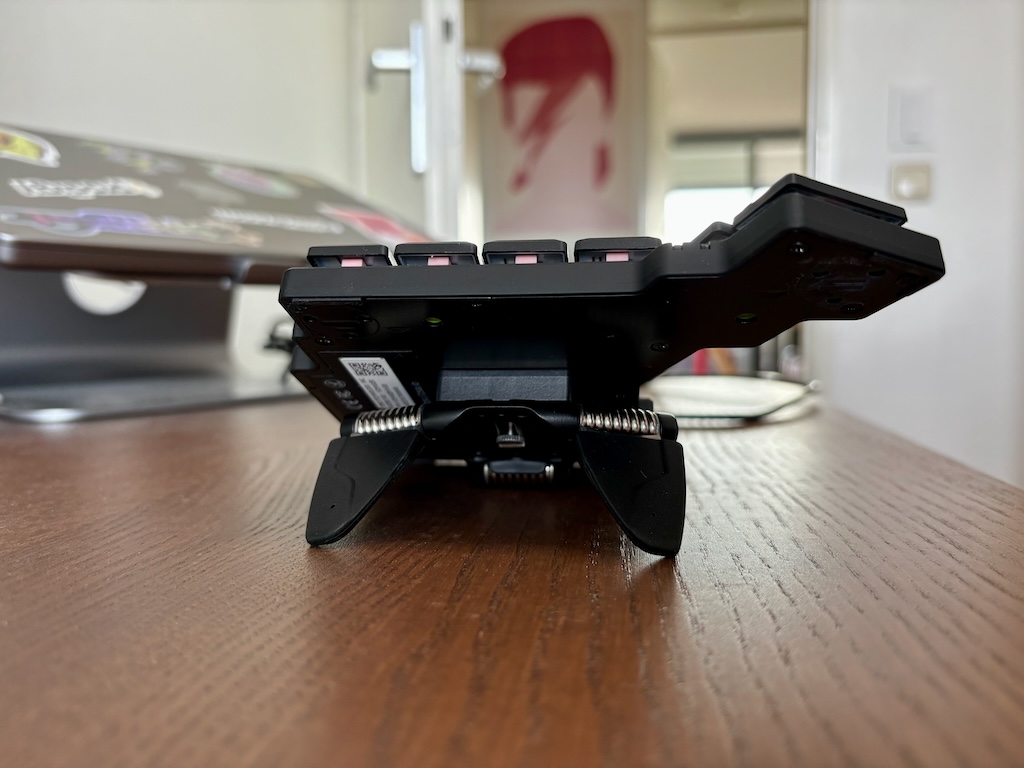
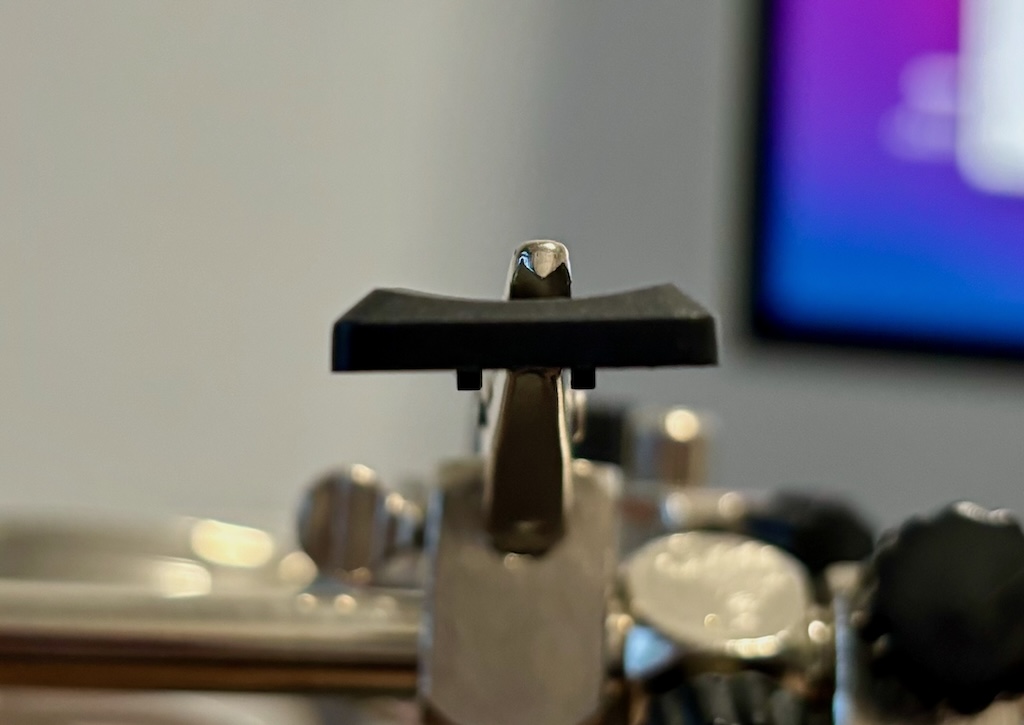
The Voyager has a clever system for attaching accessories such as tenting pucks, tenting bars, and tripod mounts. This add-on mechanism has two parts. The first is the steel bottom plate of the Voyager. This plate makes it possible to attach accessories using magnets. However, magnetic attachment alone has the downside compared to screws that accessories could slide from their original position with some force. This is where the second part comes in. The Voyager has small holes in the plate that function as accessory alignment points (green in the photo below). Accessories can have pins that slot into these holes, locking the magnetic accessory into place. This add-on mechanism is fantastic since you can attach and remove accessories in a snap.
The Voyager comes with a magnetic accessory out of the box — four pucks with which you can tent both halves. The pucks fit in the travel case and offer a quick way to set up tenting. However, they only provide 5 degrees of tenting, so they will leave people with wrist issues longing for something with a larger tenting angle.
This is where the accessory ecosystem comes in.
Larger tenting angles, the MacGyver way
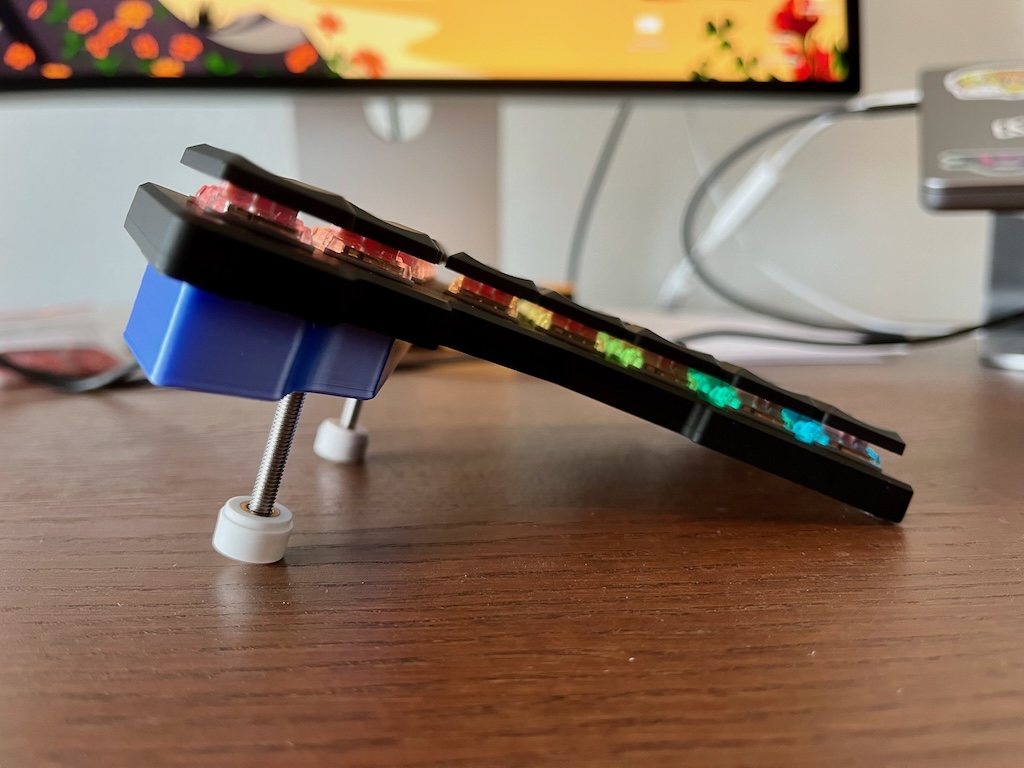
I used the Voyager for a few days with the included pucks but experienced some wrist discomfort. I normally use about 20 degrees of tenting, so I ordered the tripod mounts from ZSA with which I could tent the Voyager. But while waiting for the mounts to arrive, I decided to MacGyver another tenting solution. This is where the flexibility of the Voyager’s accessory system becomes apparent — with a bunch of magnets and some creativity, you can make your own custom mounting solutions.
First I printed the tenting bar from the Voyager printables page. This bar only provides 6 degrees of tenting, barely more than the included tenting pucks, but it is provided as a starting point for people to make their own accessories. So, I melted two M4 inserts into each tenting bar with a soldering iron, then I glued magnets into the magnet cutouts, and finally I screwed ‘legs’ into the inserts. The legs are M4 rods that I got from a local hardware store and feet from the Glove80 accessories. Aside from the printing time, making this magnetic attachment took about 20 minutes of work and tents the keyboard to 20 degrees. It works great as a makeshift (or even permanent) tenting setup.
Tripod mounts
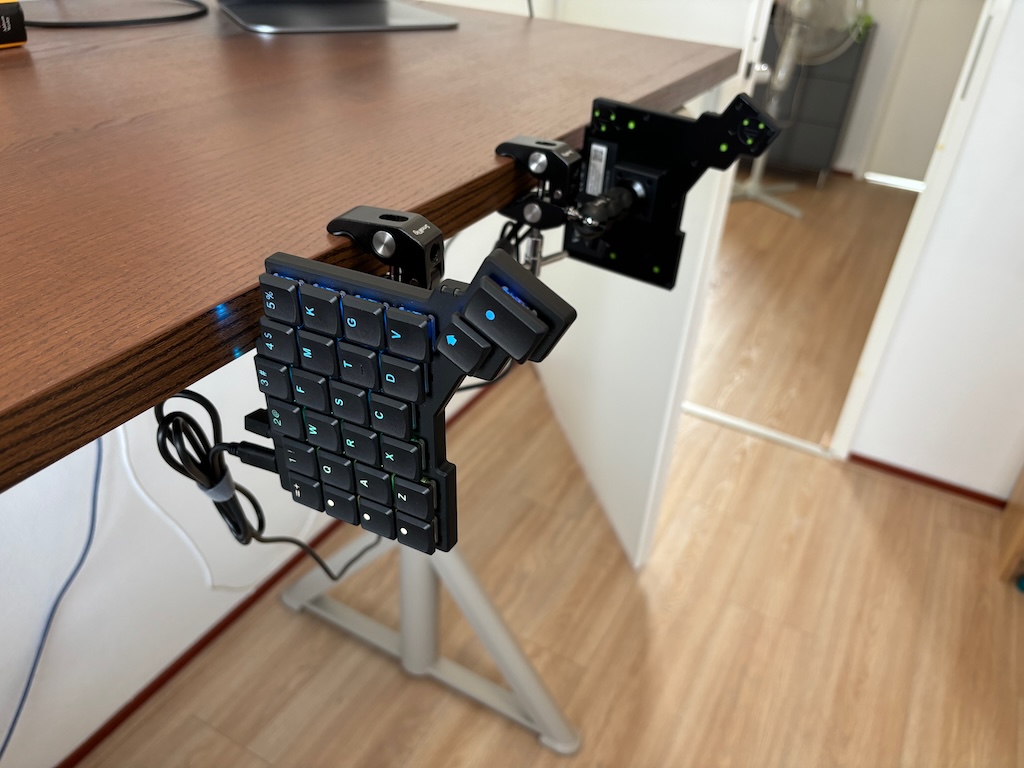
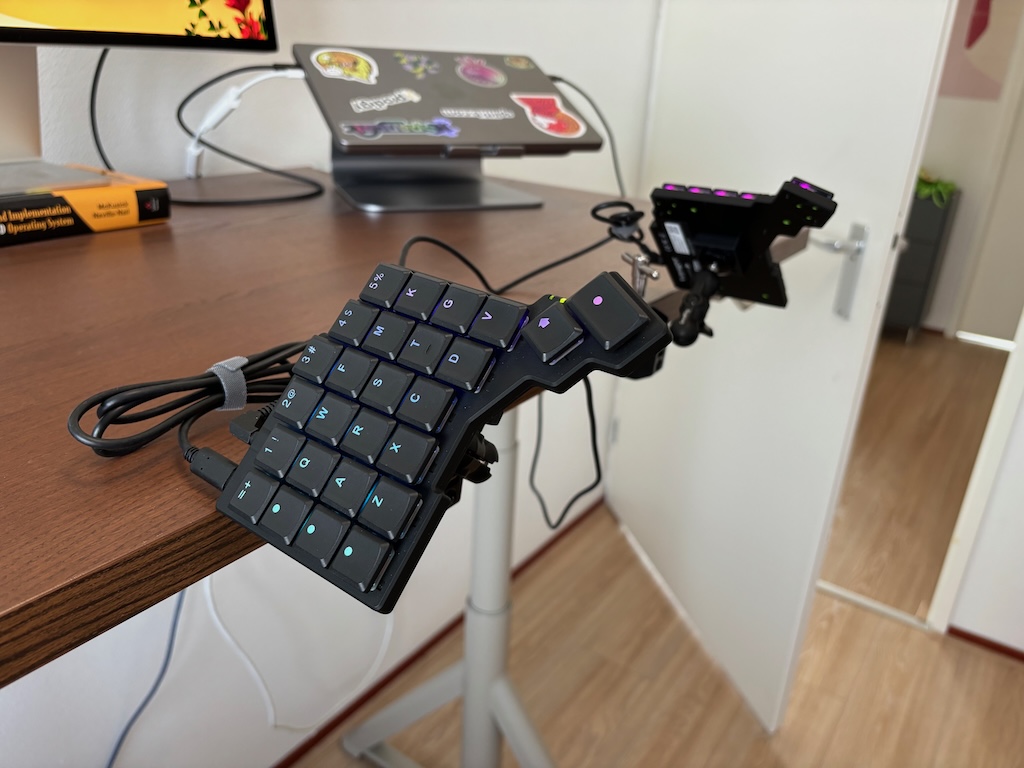
Soon after building my own tenting bars, I received the Tripod Mounts. The tripod mount comes in a beautiful Voyager-styled box. The box contains the mount itself and a 2.1m TRRS cable for use cases that require longer runs of cable. The mount has four magnets on one side and a 1/4-20 UNC tripod thread on the other. The magnets attach to middle of the Voyager’s steel bottom plate. Four alignment pins slot into holes on the Voyager to make sure that the mount stays in place. The magnets are so strong that the mounts are hard to remove from the Voyager without a tripod attached. This ensures that the mount is solidly locked in place when mounting the keyboard vertically. I tested the mounts with Manfrotto Pocket Tripods for use on a table and SmallRig C-clamps for attaching the keyboard to a table.
The Voyager and the Manfrotto Pocket Tripods are a stellar combo. These tripods use strong springs to keep the legs in place, so the tripod can be set up very quickly without having to screw the legs in place. The springs provide enough resistance for the legs not to move during typing. With the mounting plates attached, you can literally set up tenting in seconds — snap the tripods to the Voyager; extend the legs; level the keyboard; and you are up and running. The tripods can provide from ~23 up to ~34 degrees of tenting while still being stable. Even though the thumb cluster floats in the air, the Voyager doesn’t wobble at all.
Since the pocket tripods are quite flat when folded up, the Voyager fits in the travel case with the tripods still attached, making the tripods good travel companions.
Next I tried the SmallRig C-clamps. The clamps work well with the Voyager. The primary issue that I encountered is that the USB-C plug or TRRS jack would sometimes obstruct some angles. But this particular clamp only has a very short arm and I was still able to work around that because the small size of the Voyager adds a lot of maneuverability. The photos below show two different tenting angles.
Tenting the Voyager and palm support
When the Voyager is used without any tenting, it is so flat that many people can probably use it resting their palms on the table without any wrist extension. However, this is not possible anymore once the keyboard is set up with any substantial tenting angle without wrist extension. There are generally two solutions to this. The first is to hover your hands over the keyboard and (optionally) supporting your arms using a chair’s arm rests. The second is to have palm rests that tent with the keyboard.
As someone who has typed on keyboards with palm rests for a longer time (e.g. Kinesis Advantage2 and Glove80), switching to hovering was quite a transition. Initially, my lower arms and wrists were quickly tired. This improved after a while, but I continue to prefer using a good palm rest. I hope that there will be an accessory that adds palm rests to the Voyager at some point in the future.
Switches and keycaps
The Voyager uses low-profile Kailh Choc v1 switches. Choc switches have a much lower height than their MX counterparts. They also have a shorter actuation distance (1.5mm) than most MX switches (2.0mm). This has the ergonomic benefit of requiring less finger travel. Under each switch is also a programmable RGB LED. Choc switches have a cut-out in the bottom housing and transparent top housing for the RGB LEDs to shine through1.
The Voyager uses MX key spacing (the distances between the middle points of the keys). The key caps also have the same 18mm x 18mm dimensions as MX caps. This makes the keyboard feel less cramped than some Choc-spaced keyboards and provides an easier transition for people coming from a traditional keyboard or an ergonomic keyboard with MX switches. That said, some people prefer the tighter Choc spacing.
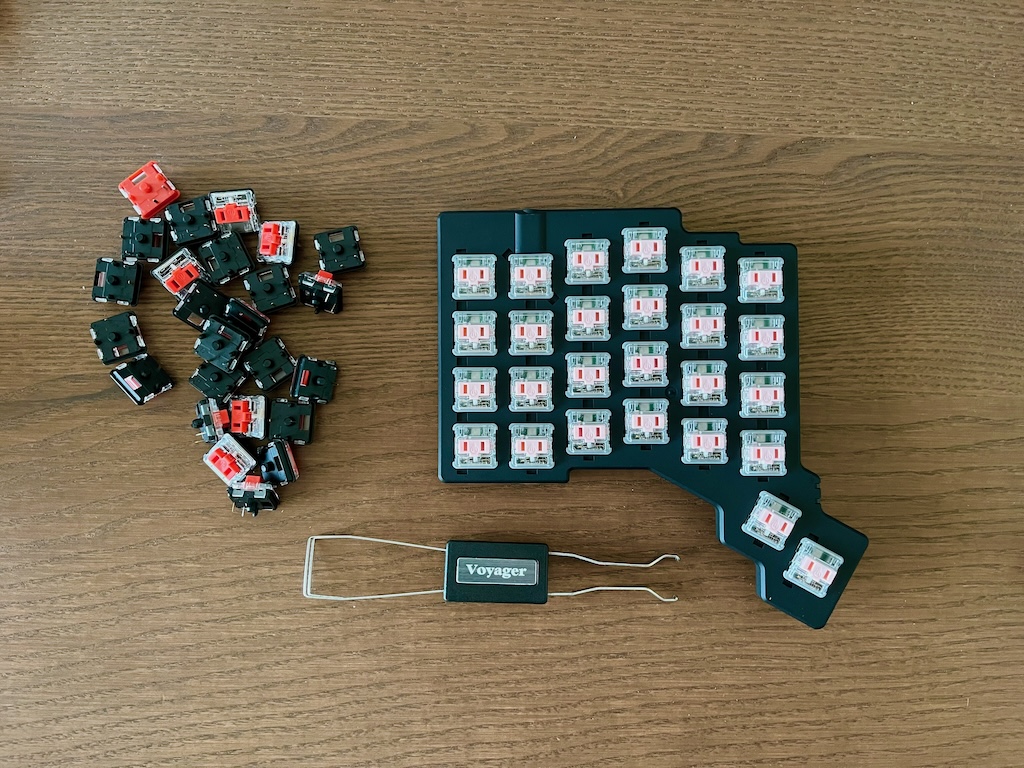
The Voyager can be ordered with Red (Linear), White (Clicky), or Brown (Tactile) switches. However, the initial switch choice is not a strong commitment as the Voyager supports hotswapping, so the switches can be replaced with other Choc v1 switches.
The Voyager comes with a tool that is a switch puller on one side and a keycap puller on the other. Removing switches from the Voyager is slightly different from removing switches from most MX hotswap boards. MX switches have a ledge above the switch plate that allows you to pull a switch out. Since Choc switches are lower profile, the ledges for pulling out the switches would be inside the top plate. ZSA solved this issue by making small indents in the top plate that allow you to get proper grip on the switches with the switch puller. These indents are usually in the middle of the switch, however ZSA had to place the indents on the sides or diagonals for some of the switch positions because the space in the middle is occupied by electronics (such as the TRRS jack, see the photo above). I found the switches with the indents in the middle or on the diagonal easy to remove. Removing the switches with the indent on the side took a bit of practice before I could remove them smoothly.
I tested hotswapping several times, replacing the Reds with Pro Reds, Sunsets, and my all-time favorite, the very light Pinks (20gf). The support for hotswapping is very welcome – it often takes a few attempts to find your ideal switch, especially when you are not familiar with Choc switches yet.
The Voyager keycaps were made in collaboration with Tai-Hao and are absolutely beautiful. Similar to the MCC profile designed by MoErgo, the profile of the Voyager has a half-pipe shape, meaning that the caps only have ‘walls’ on the sides. As a result, you fingers can comfortably slide up and down the columns, while the walls make it easy for your fingers to find the keys and stay in their lanes.
The Voyagers keycaps are made from PBT plastic. The texture of the keycaps is very nice. The caps provide some grip, but do not feel too rough. The keycaps are double shot and let the RGB backlight shine nicely through the legends. The Voyager comes with generous set of additional keycaps, including homing keys for Colemak and Dvorak users, homing caps with shine-through dots for other layouts, and caps with the QMK and Voyager logos.
Build quality
The build quality of the Voyager is among the best. The steel bottom plate makes the Voyager very strong and gives it some necessary weight. This avoids the issue that some small keyboards have, where lightness and the small distance between bump-ons makes it easy for the keyboard to shift during use. The Voyager’s top plate is made from plastic, but seems very strong. With some other keyboards, I’ve had issues with the top plate getting scratched after contact with a switch removal tool, but I found no scratches on the Voyager after several swaps. The hotswap sockets are supported by a green tray, making it less likely that the solder joints of the sockets tear after repeated insertions.
The USB-C port and TRRS jack on the Voyager feel very sturdy, and connecting the cables produce satisfying clicks.
Innards: microcontroller and firmware
The left half of the Voyager uses a GD32F303 microcontroller — a well-known and well-supported ARM Cortex-M4 microcontroller. The controller has a roomy 3072KiB of flash memory, giving the Voyager plenty of space for a host of firmware features. The right half uses the MCP23018 I/O expander for key matrix scanning and communication with the LED driver. Using an I/O expander rather than a second microcontroller has the benefit that only the left half needs to be flashed when upgrading the firmware. The halves are connected with a TRRS cable. The female USB-C connector is used to connect the keyboard to the host computer — the provided USB-C cables and the (optional) USB-C to USB-A adapter come handy here.
The Voyager uses the popular open source QMK firmware. Together with the ZMK firmware for Bluetooth keyboards, this is the most extensive keyboard firmware available. QMK supports many features, such as layers, mod-taps, one-shot layers, capsword, auto shift, combos, tap-dance. The Voyager uses ZSA’s fork of QMK. This allows ZSA to test QMK changes before rolling out updates to their keyboards.
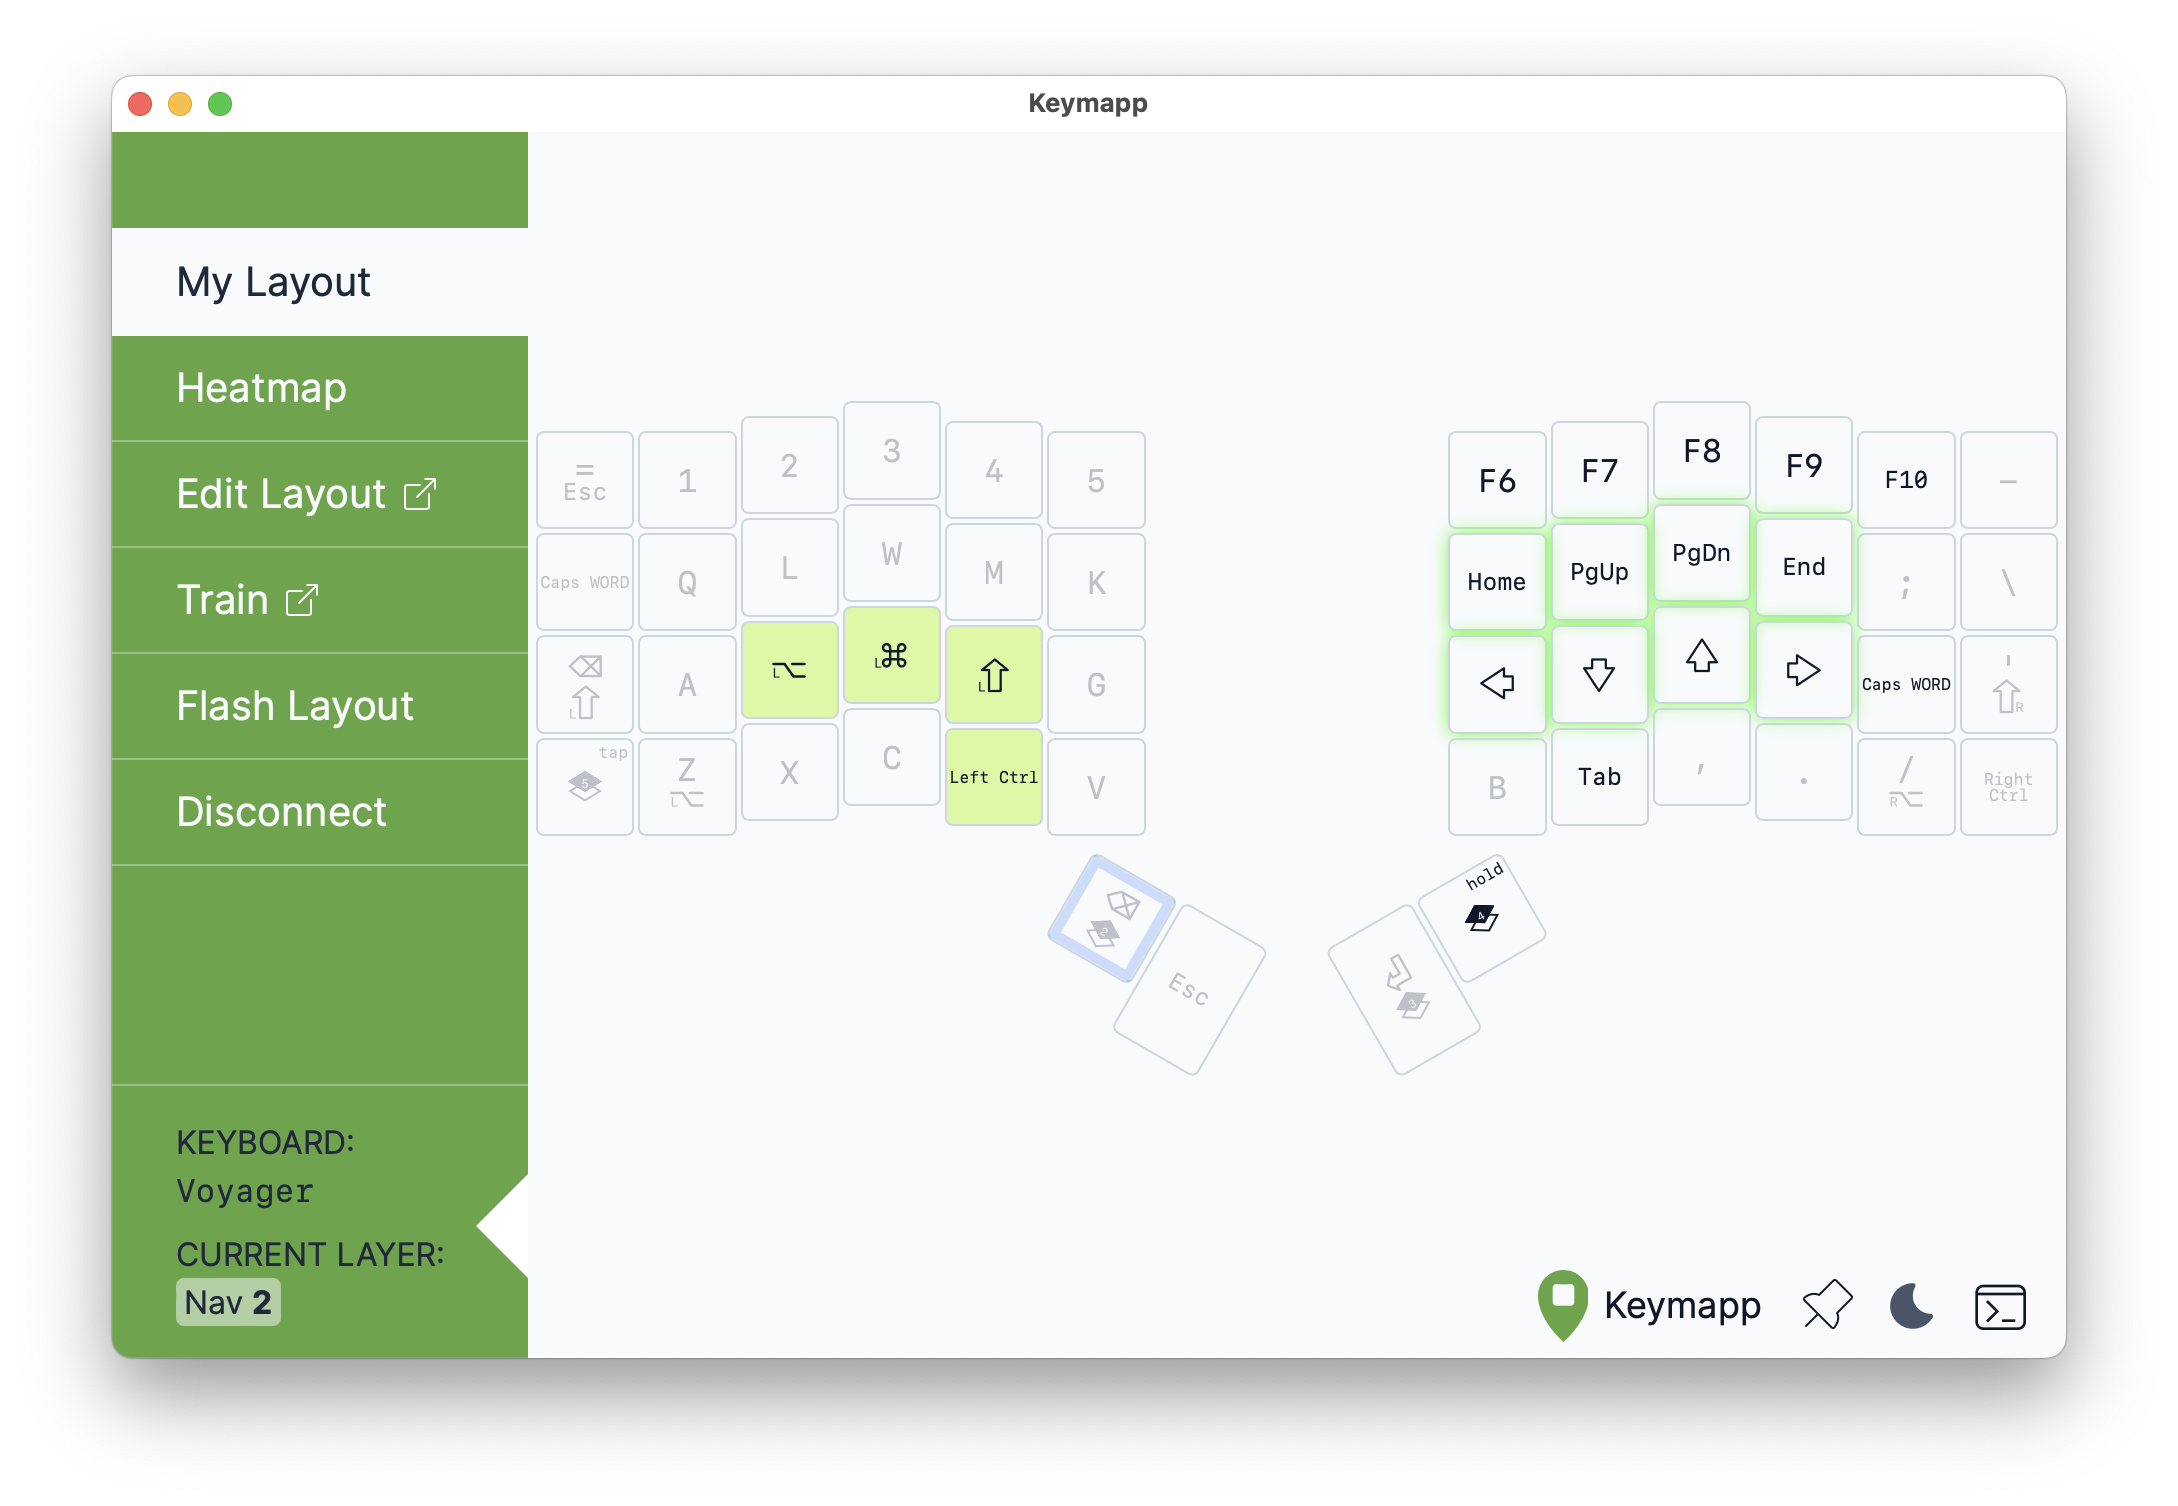
The Voyager has four status LEDs to communicate the QMK state. By default, the status LEDs encode the currently active layer in binary (for $2^4=16$ different layers). Besides that, the LEDs also light up as part of the startup sequence to show that the keyboard is powered up. If you think the layer LEDs are to subtle, you can also use the per-key RGB backlighting to highlight the layer status.
ZSA has made a deliberate choice to make their keyboards wired, so the Voyager does not have Bluetooth support. Initially, this may seem strange for a keyboard that is also designed for travel, since it’s not nice to have to manage a bunch of wires when working on the go. But Bluetooth also has its downsides for a travel keyboard. The Voyager is only 8mm thick (excluding switches and key caps), and fitting a battery in such a thin case requires a custom battery, which is out of the reach of most smaller companies. So, adding a batteries for wireless operation would result in a thicker keyboard.
Another issue with Bluetooth is that there can be a lot of interference in busy locations like conferences. In such locations, there are usually many devices broadcasting simultaneously and USB 3 devices are well-known to cause inference in the 2.4GHz band. In these situations, a wired keyboard is going to be much more reliable. Ideally, a keyboard can switch between wired and wireless operation, but QMK only has limited support for Bluetooth. ZMK (the de facto open source wireless firmware) keyboards can be used wired, but that configuration requires an I/O expander in one half (or other hardware acting as a key matrix scanner), meaning that the halves would always need to be connected wired. ZMK currently does not support wired split when both halves use a Bluetooth microcontroller.
Software
As mentioned earlier, the Voyager runs a fork of the QMK firmware. Configuring QMK can be daunting for non-programmers. The keyboard layout and settings are built into the firmware, so changing them requires rebuilding the firmware. Building firmware requires that you are able to set up a proper build toolchain. Moreover, some configuration changes require that you know your way around C or Makefiles. This is where ZSA’s Oryx comes in. Oryx is an online keyboard layout editor that removes much of the technical complexity of configuring a QMK keyboard. It makes things like remapping keys, adding layers or configuring per-key RGB straightforward. Oryx also takes care of building the firmware, so it is not necessary to install the build toolchain for QMK. Oryx is very extensive, so describing all of its features is out of scope for this review. Since it can be tried without owning a ZSA keyboard, my recommendation is to just try it out if you do not have prior experience with Oryx yet. So, instead, I’ll mention three software features that stood out to me and are not available in most other ergonomic keyboards.

The first feature is the possibility to flash firmware directly from Oryx. Most online keyboard layout editors require you to download the firmware and then flash the firmware using a local application or command-line tool. On Chrome-based browsers, the Voyager can be flashed from Oryx using WebUSB. This is very straightforward — after building the firmware, press the Save to my keyboard button, restart the Voyager into the bootloader using the reset button or the special Reset key, and confirm in the browser that Oryx is allowed to connect to the keyboard. That’s it!
Another great feature of Oryx is its version management. Some other editors do not have a revision history or just a single chain of changes, but Oryx allows you to make multiple layouts and each layout has its own revision history. The history is annotated using the commit messages that you enter when saving keyboard layout changes. The nicest aspect of layout version management is that you can fork a revision into a new layout. This makes it easy to go on a tangent with a layout (e.g. I used it to experiment a little with Callum/Seniply-like mods) or fork someone else’s layout as a starting point for your own.
Finally, it’s worth mentioning the Keymapp application. Aside from flashing firmware, this application helps with iterating on a layout. It does so in two ways: tirst, it can show a live view of the currently active layer’s layout. The window can be made sticky, so that it is always shown on top of other windows. This makes for a great reference and works better than printed layout sheets because it shows just the active layer. The second way Keymapp helps with improving layouts is through its heat map tab. It shows how often each key is pressed while Keymapp is active. Triggering a layer shows the heat map for that layer. This heat map can be helpful in evaluating if any of the frequently-used keys are on the peripheries and should be moved to positions that are easier to reach. Existing users of QMK may wonder how Keymapp is able to monitor layer changes and key presses. QMK has a little known feature called raw HID that supports bidirectional communication between the keyboard and host computer.

The only software shortcoming that I found in my daily use is the lack of support for bilateral combinations in Oryx. Many popular layouts smaller keyboards use so-called home row mods. Home row mods make keys on the home row dual-function. They’ll emit a letter when they are tapped and will trigger a modifier when held. The issue that occurs with home row mods is that if someone types fast in a high-roll layout (such as Colemak or Canary), there can be overlap in key presses and some key presses are interpreted as modifiers as a result. Bilateral combinations avoid this issue by interpreting overlap in key presses on the same hand as taps rather than holds. I hope that ZSA will add support for bilateral combinations in some form in the future.
Advanced users can work around the lack of Achordion support by downloading the keymap definition from Oryx and the compiling the firmware using ZSA’ own fork of QMK. Though I hope that support for bilateral combinations will be added to Oryx in the future, since home row mods are becoming increasily popular in the ergonomic keyboard community.
Hackability and ecosystem
Since the Voyager has only been available for a short time, there aren’t many hardware accessories available yet. As of writing (November 2023), the only accessory available from ZSA is the aforementioned Tripod Mount. ZSA has a great line-up of accessories for the Moonlander and I can only hope that the Platform and Zip Kit become available for the Voyager as well2.
The Voyager’s steel bottom plate with alignment points makes it really easy to build custom accessories for the Voyager. It is likely that many third-party printables will show up, such as the Voyager tenting stand that is already available. It should also be possible to extend the Voyager with additional input devices such as trackpads in a similar way.
One aspect of the ecosystem that I find a bit lacking is the absence of an official discussion forum. There are subreddits for the ErgoDox, Moonlander, and Voyager, but many keyboard vendors now have a Discord server. I understand that moderating a server and building a nice community is a large responsibility and takes time, but it is nice to have an official community for questions, sharing mods, etc.
Traveling with the Voyager
It feels almost silly to write a separate section about the suitability of the Voyager for travel. As the name suggests, travel is one of the strong suits of the keyboard. The Voyager is compact and robust, making it an ideal keyboard to take along to meetings or on trips. As discussed in Tripod mounts, the magnetic accessory attachment system makes it easy to set up and tear down Voyager accessories when you are on-the-go.
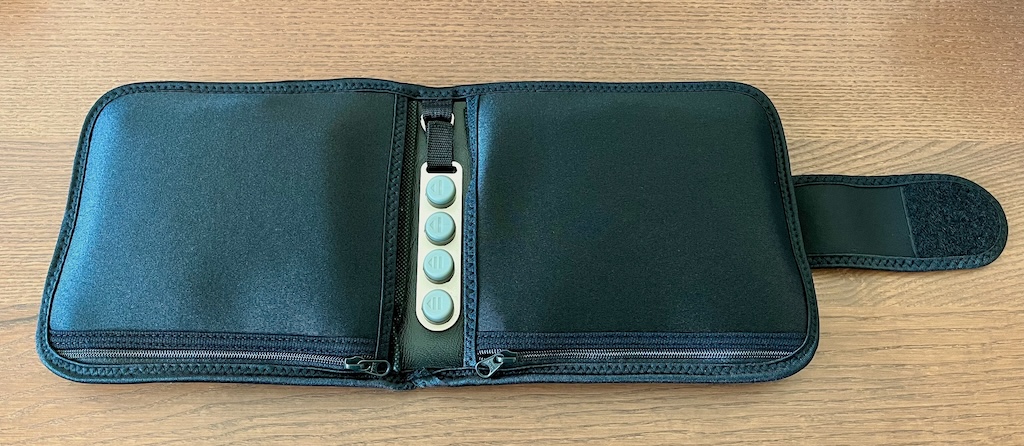
The Voyager includes a travel case. The keyboard halves slide into different halves of the case, which is then folded up. The case also has two small compartments with a zipper to store TRRS and USB-C cables. The middle of the case has a removable metal plate to which the tenting pucks can be attached. Like the keyboard, the case is very compact and will fit into a laptop backpack without any issues and leave plenty of space for other items. My only gripe with the case is that the two cable compartments stack when the case is closed. The closed case would be thinner if the compartments were on opposite sides.
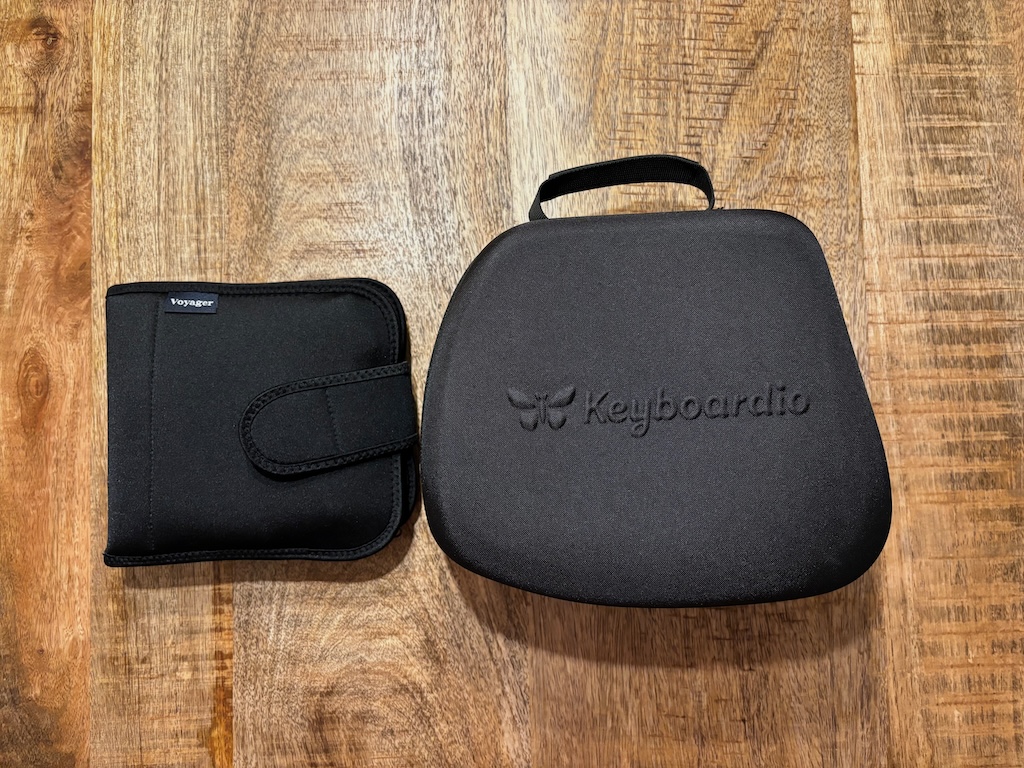
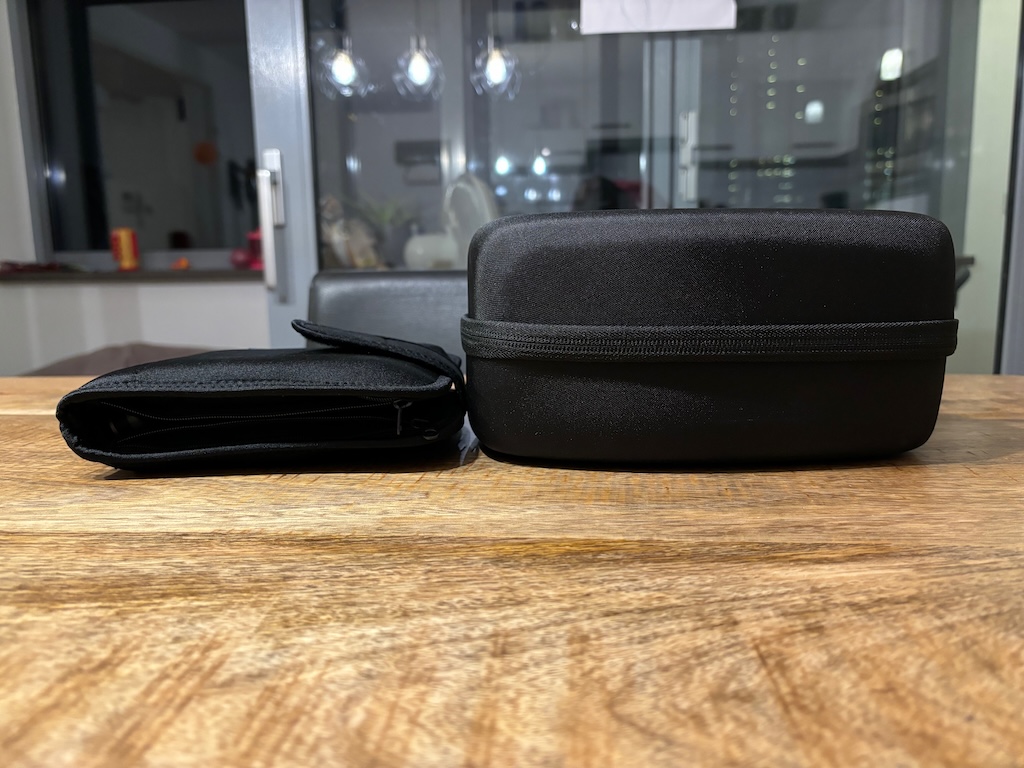
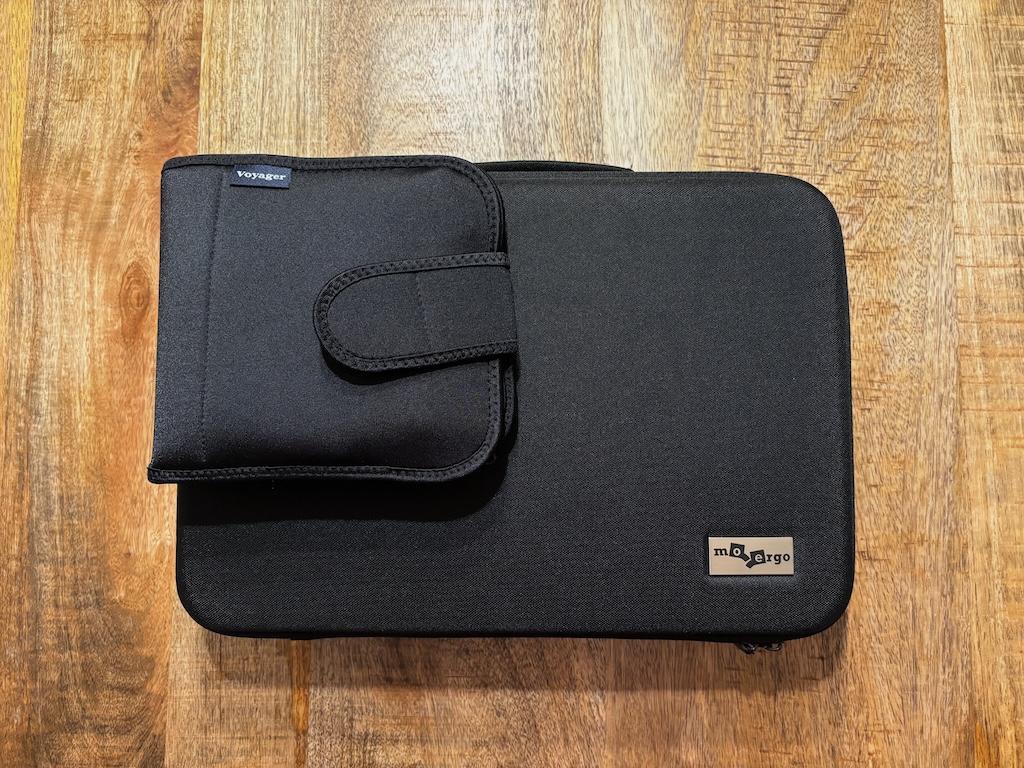
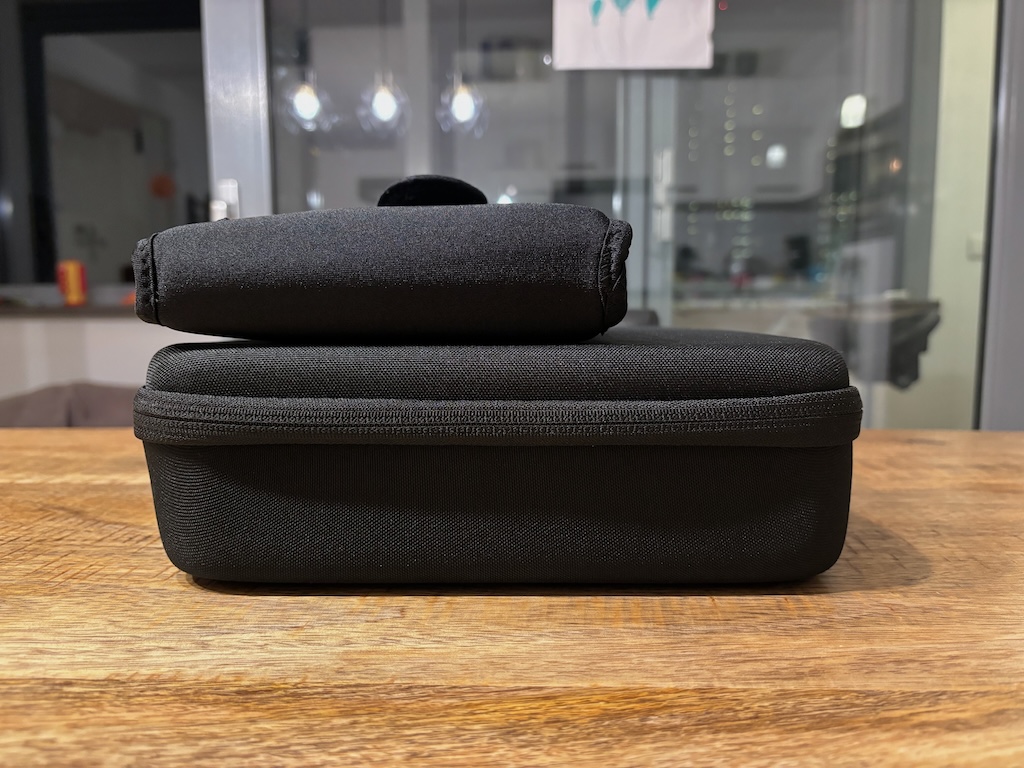
To give an idea of the comparative size of the Voyager in its case, the photos below show the Voyager compared to the Keyboardio Model 100 in its case from above and from the side. The Model 100 case also stacks the keyboard halves. The small footprint and low height of the Voyager makes it much more compact in comparison.
The difference in volume is even larger when comparing the Voyager with the Glove80, a key well keyboard. While the Glove80 is small compared to other key well boards like the Maltron or Kinesis Advantage, it requires a small suitcase to transport.
Verdict
With the Voyager, ZSA moves into the space of small, low-profile Choc keyboards and it does so in a triumphant way. The Voyager stands on the shoulders of its trailblazers such as the Corne, Lily58 and Piantor, taking their ideology, but delivering it as a fully-realized experience with unparalleled build quality, awesome keycaps and a travel case. To that it adds an innovative new system for attaching accessories and ZSA’s Oryx software, which is still unparalleled.
Those of you who read my review of the Glove80 might wonder what I think of the comfort of the Voyager compared to key well keyboards like the Glove80 or the Kinesis Advantage. I will readily admit that I believe that the Voyager misses some of the comfort of the palm rests and key wells these boards offer. But does that make the Voyager worse? No. It chooses a different set of trade-offs. While the Voyager doesn’t have a key well and palm rest, it also doesn’t have the large volume of these key well keyboards, making it much more compact and robust. People have different priorities and if you happen to take your keyboard to work or on trips, it is undeniable that the Voyager offers a better trade-off between comfort and portability. As the old adage goes, “the best keyboard is the keyboard that you have with you”.
Summarized, if you are looking to get an awesome, compact ergonomic keyboard, the Voyager is the keyboard to get. It is an investment, but it is likely to last years and your arms, wrists, and hands will thank you for it.
Positive:
- Small and great build quality, making the Voyager a great travel companion.
- Excellent magnetic system for attaching accessories, quick setup and teardown.
- Substantial layout improvements over earlier ZSA keyboards: better positioning of thumb keys and improved column stagger.
- Hotswappable Choc switches reduce finger travel compared to MX counterparts.
- The double-shot PBT keycaps look and feel awesome and the keyboard comes with a large set of additional keycaps.
- Great software ecosystem: Oryx is still the gold standard for layout editors and the new Keymapp application is great for iterating on a Voyager Layout.
- Comes with a travel case.
- Wired: super reliable, no battery management.
Negative:
- It would be nice if an official palm rests were included or available as an accessory to avoid hovering when using larger tenting angles.
- Wired: requires cable management, which can be annoying on-the-go.
- Home row mods can be a bit janky with high-roll layouts due to the lack of support for bilateral combinations in Oryx.
Thanks to: ZSA for sending me a keyboard to review and answering my questions; and to M.K. for proofreading the first draft, all remaining errors are mine.